

Registering Agents
Every AI agent you want to govern with OpenBox needs to be registered first. Registration creates the agent entity in the platform, generates an API key for SDK authentication, and sets the initial risk profile that determines how strictly OpenBox governs the agent's behavior.
Quick Steps
- Log in to the OpenBox Dashboard
- Navigate to Agents → Click Add Agent
- Configure the agent:
- Workflow Engine: Temporal
- Agent Name: Your agent name (e.g., "Customer Support Agent")
- Description: What your agent does
- Teams: Assign to one or more teams
- Icon: Select an icon
- Configure Initial Risk Assessment and Attestation (see details below)
- Optionally link the runtime to a Project for repository lineage
- Click Add Agent
- In the Save Your Agent Credentials dialog that opens, copy the API key, DID, and private key (or the pre-formatted env-var block) into your secrets manager. All three are shown only once.
The API key (obx_live_xxxxxxxxxxxx) and the agent's Ed25519 private key are shown only once. Lose either and you'll need to rotate from Agent Settings → API Access.
Detailed Configuration
Navigate to Agents and click the Add Agent button in the top right corner.
Workflow Engine
Select the workflow engine your agent uses:
| Engine | Status |
|---|---|
| Temporal | Available |
| n8n | Coming soon |
| LangChain | Coming soon |
Agent Information
| Field | Required | Description |
|---|---|---|
| Agent Name | Yes | Human-readable name (e.g., "Customer Support Agent") |
| Agent ID | Auto | Auto-generated unique identifier (e.g., "CSB-001") |
| Description | No | What does this agent do? |
| Teams | No | Assign to teams for access control |
| Icon | No | Visual identifier (headphones, code, trending-up, file-search, bot) |
All of these fields can be edited after creation from the Agent Settings page.
Project Lineage
If your organization uses Projects, you can link the new runtime to repository lineage during registration.
| Field | Description |
|---|---|
| Project | Existing repository project that owns the agent code. |
| Repository Agent | Logical agent inside the project. In monorepos, this is the path-mapped agent that matches the runtime. |
| Branch | Repository branch associated with this runtime. OpenBox uses the synced branch list from the connected repository. |
This link lets OpenBox show the runtime in the agent's Lineage tab and connect future sessions to repository lifecycle events and governance snapshots.
You can skip project lineage during registration and link the runtime later from Agent Settings → Lineage.
Agent Credentials
When you finish registering a new agent, OpenBox opens a Save Your Agent Credentials dialog containing everything the agent needs to authenticate:
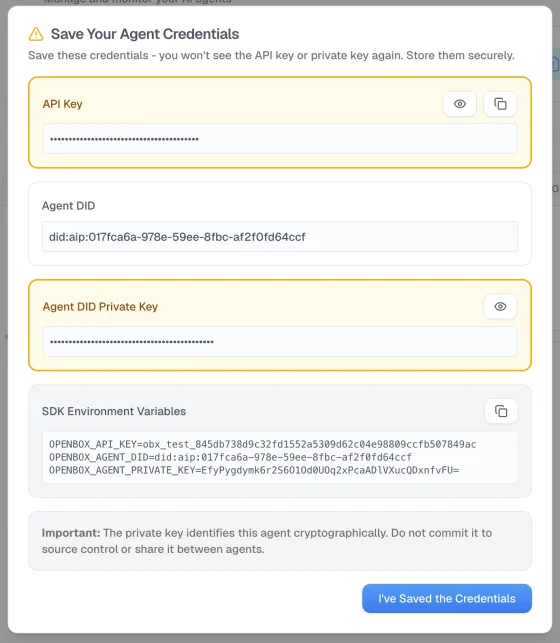
| Credential | What it does |
|---|---|
API Key (obx_live_* / obx_test_*) | Bearer token the SDK uses to authenticate the HTTP call. |
Agent DID (did:aip:<uuidv5>) | The agent's cryptographic identifier. |
| Agent DID Private Key (Ed25519) | Used by the SDK to sign governance requests so OpenBox can prove they came from this agent. |
| SDK Environment Variables | OPENBOX_API_KEY, OPENBOX_AGENT_DID, and OPENBOX_AGENT_PRIVATE_KEY pre-formatted for copy-paste into your secret store. |
The API key and private key are shown once in this dialog and are not stored by OpenBox. Copy them — or the env-var block — into your secrets manager before clicking I've Saved the Credentials. If you lose the private key you'll need to rotate it.
New agents default to Require signed requests = on, so the SDK must present a valid signature on every governance request from the moment the agent goes live. You can toggle this from Agent Settings → API Access at any time; with it off, the SDK authenticates with the API key only.
Initial Risk Assessment
Expand the Initial Risk Assessment section and configure your agent's risk profile parameters
Risk Profile Presets
Select a preset that matches your agent's intended use:
| Preset | Risk Profile Score | Use Cases | Initial Tier | Default Governance |
|---|---|---|---|---|
| Low Risk | 85 – 100 | Log reader, report generator | Tier 1–2 | Fully autonomous |
| Medium Risk | 55 – 75 | Internal automation, data processor | Tier 2–3 | Mostly autonomous |
| High Risk | 25 – 45 | Customer data agent, API integrator | Tier 3 | Approval for sensitive ops |
| Critical Risk | 0 – 20 | Production admin, autonomous trader | Tier 3–4 | HITL for most operations |
Higher Risk Profile Score = lower inherent risk = higher Trust Score ceiling. Initial Tier assumes Behavioral=100 and Alignment=100 (clean slate).
Risk Profile Parameters
The Risk Profile evaluates risk across three categories:
Base Security (25% weight)
| Parameter | Options |
|---|---|
| Attack Vector | Network (1), Adjacent (2), Local (3), Physical (4) |
| Attack Complexity | Low (1), High (2) |
| Privileges Required | None (1), Low (2), High (3) |
| User Interaction | None (1), Required (2) |
| Scope | Unchanged (1), Changed (2) |
AI-Specific (45% weight)
| Parameter | Options |
|---|---|
| Model Robustness | Very High (1), High (2), Medium (3), Low (4), Very Low (5) |
| Data Sensitivity | Very High (1), High (2), Medium (3), Low (4), Very Low (5) |
| Ethical Impact | Very High (1), High (2), Medium (3), Low (4), Very Low (5) |
| Decision Criticality | Very High (1), High (2), Medium (3), Low (4), Very Low (5) |
| Adaptability | Very High (1), High (2), Medium (3), Low (4), Very Low (5) |
Impact (30% weight)
| Parameter | Options |
|---|---|
| Confidentiality Impact | None (1), Low (2), Medium (3), High (4), Critical (5) |
| Integrity Impact | None (1), Low (2), Medium (3), High (4), Critical (5) |
| Availability Impact | None (1), Low (2), Medium (3), High (4), Critical (5) |
| Safety Impact | None (1), Low (2), Medium (3), High (4), Critical (5) |
Predicted Risk Tier
As you configure Risk Profile parameters, the form shows a real-time prediction:
Predicted Risk Tier: TIER 2
Based on current configuration
See Assess for how the Risk Profile impacts Trust Score.
Attestation
In the Attestation section, configure cryptographic signing for audit-grade evidence.
For now, use AWS KMS (recommended/default):
- Select AWS KMS
- Keep the default settings
See Attestation for how execution evidence is produced and verified.
Creating the Agent
- Review all fields
- Click Add Agent
- In the Save Your Agent Credentials dialog, copy the credentials (see Agent Credentials above) and click I've Saved the Credentials
You'll be redirected to the new agent's detail page.
Next Steps
Now that you have an agent and API key:
- Wrap an Existing Agent — Already have a Temporal agent? Add the OpenBox trust layer
- Run the Demo — Clone the demo repo and see governance in action
- Agents — View and manage all registered agents